Networking @ catallenya-sev

This is a series of posts about my self-hosting experience. You are reading this post from this server!
Networking is a funky topic when delving into self-hosting. While slapping some services on bare metal that is only accessible locally is technically self-hosting in the most literal sense, it isn't really useful until we can talk to it with your devices outside the local network.
This conundrum is further exacerbated if you're an average bloke like me trying to host from home. Simply exposing your applications with a network address isn't going to work. It often boils down to most home Internet Service Providers (ISPs) assigning dynamic IP addresses instead of static ones.
This means while your server might be reachable for a couple of weeks, eventually your ISP will cycle out your address. For the providers, there are both technical limitations and incentives as to why they do so. ISPs often offer a 'pool' of addresses that customers can use, reallocating them as clients come online or go offline. Considering that most of the web still runs on IPv4, the total supply of addresses is limited, and these providers wouldn’t want to offer a permanent address for a machine that might only use it for a short period of time (think of all the IoT devices lying around!).
Handing every person a fixed address might embolden some power users to offer web services from their home, incurring a huge amount of traffic for a popular service. Ultimately, these ISPs would recommend a business account to acquire a static IP address - an expensive endeavor.
Fortunately for us, there are some nifty products out there in the wild to help mitigate this. In my home setup, I use Cloudflare's tunnel offering and Tailscale's VPN to expose my services.
 tailscalecloudflarecaddyserver
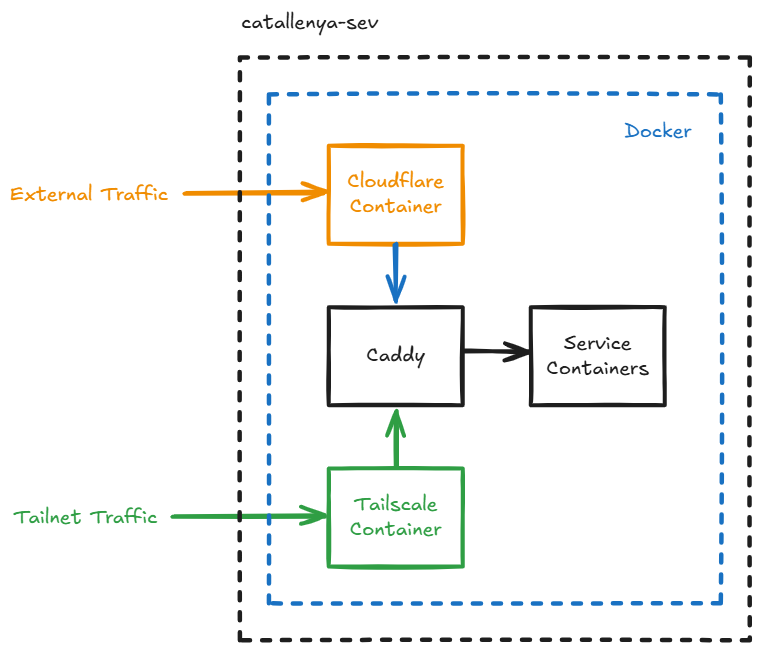
For this project, we expose services that should be publicly accessible using Cloudflare's proxy with the other apps only accessible by authorized devices signed on the tailnet. To broker the incoming traffic, I use Caddy in reverse proxy mode.
Setup
We start by adding the required caddy, tailscale and cloudflared images to our docker-compose file. This goes alongside any other services we would like to spin up. Additionally, we also create an internal docker network to communicate between the containers - this is denoted as caddy-internal here.
For this example, I am using Ghost as the service we want to expose to the internet, and ntfy as an internal service accessible only by tailnet.
services:
  caddy:
    container_name: caddy
    image: caddy:latest
    restart: unless-stopped
    networks:
      - caddy-internal
    env_file:
      - .env
    ports:
      # Map our reverse proxy ports here.
      - ${GHOST_REVERSE_PROXY_PORT}:${GHOST_REVERSE_PROXY_PORT}
      - ${NTFY_REVERSE_PROXY_PORT}:${NTFY_REVERSE_PROXY_PORT}
    volumes:
      - ./caddy/Caddyfile:/etc/caddy/Caddyfile
      - ./tailscale/tmp/tailscaled.sock:/var/run/tailscale/tailscaled.sock
    labels:
      - com.centurylinklabs.watchtower.enable=true

  tailscale:
    hostname: catallenya
    container_name: tailscaled
    image: tailscale/tailscale:latest
    restart: unless-stopped
    network_mode: host
    cap_add:
      - NET_ADMIN
      - NET_RAW
    volumes:
      - /dev/net/tun:/dev/net/tun
      - ./tailscale/data:/var/lib
      - ./tailscale/tmp:/tmp
    environment:
      - TS_STATE_DIR=/var/lib/tailscale
      - TS_AUTH_KEY=${TAILSCALE_AUTH_KEY} # Ensure this is securely managed

  cloudflared:
    container_name: cloudflared
    image: cloudflare/cloudflared:latest
    restart: unless-stopped
    networks:
      - caddy-internal
    command: tunnel -credentials-file /run/secrets/cloudflared-token run catallenya-sev
    secrets:
      - cloudflared-token

  # Example application that is accessible only on tailnet.
  ntfy:
    container_name: ntfy
    image: binwiederhier/ntfy
    restart: unless-stopped
    networks:
      - caddy-internal
    command:
      - serve
    volumes:
      - ntfy-cache:/var/cache/ntfy
      - ntfy:/etc/ntfy

  # Example application that is accessible on the internet.
  ghost:
    container_name: ghost
    image: ghost:latest
    restart: unless-stopped
    networks:
      - caddy-internal
    environment:
      - database__client=sqlite3
      - database__connection__filename=/var/lib/ghost/content/data/ghost.db
      - url=${PUBLIC_URL}
    volumes:
      - ${GHOST_VOLUME}:/var/lib/ghost/content

secrets:
  cloudflared-token:
    file: cloudflared/token.json

# Create an internal network between services.
networks:
  caddy-internal:
    external: false
docker-compose file
Proceed to bootstrap the necessary reverse proxy routes, mapping target ports to the ports the services run on. Traffic from my tailnet domain targeting a specified port will be routed to ntfy:80, while request to my domain routes to ghost:2368.
{$TAILNET_DOMAIN}.{$TAILNET_DNS_NAME}:{$NTFY_REVERSE_PROXY_PORT} {
    reverse_proxy ntfy:80
}

# We configure our own reverse proxy for Ghost. Since we are handling the SSL termination,
# we set headers to coerce Ghost to trust the connection.
# See:
# https://caddy.community/t/solve-infinite-301-loop-then-502-with-ghost-and-caddy/7226
# https://ghost.org/docs/faq/proxying-https-infinite-loops/
:{$GHOST_REVERSE_PROXY_PORT} {
    reverse_proxy ghost:2368 {
      header_up Strict-Transport-Security "max-age=31536000; includeSubDomains; preload"

      # this one is done automatically for you by Caddy
      # header_up Host {host}

      header_up X-Forwarded-Proto "https"
      header_up X-Forwarded-For {remote}
      header_up X-Real-IP {remote}
    }
}
Caddyfile
Create a tailnet on Tailscale, include all devices that should have access to the internal ntfy service.
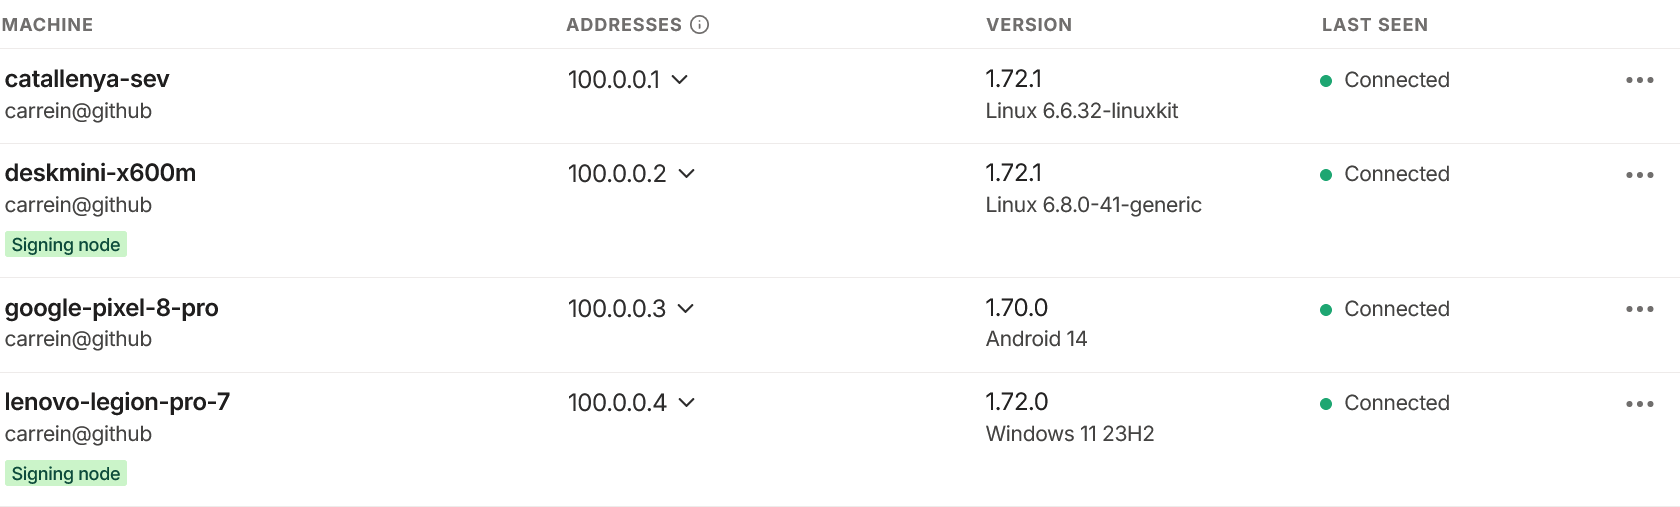
We should be able to access the ntfy service on any of the listed devices above. We will still need to provision a self-signed certificate to silence insecure warning that might come from our browser or APIs since they are unaware of the tailnet encryption. We can generate a SSL cert and expose this to Caddy so the requests are piped. I am most grateful for this helpful Reddit post that was key in getting this working properly with our docker-compose stack.
docker exec tailscaled tailscale --socket /tmp/tailscaled.sock cert <the server domain name>You can verify that the provisioning is successful after by accessing the service on an authorized device on a browser by looking at the padlock icon next to the URL field.
I was unable to figure a way to get Caddy to work with subdomains instead of ports. This might be tangentially related to how MagicDNS (Tailscale's method of assigning readable DNS name to device instead of referring to them by pure IP address), is not setup for subdomain records yet. If you have this figured out, I would love to get in touch!
To wire up our ghost service, we still have to configure Cloudflare. Sign up for a free account and navigate to the Zero Trust section. Create a new tunnel here that points to our cloudflared container.
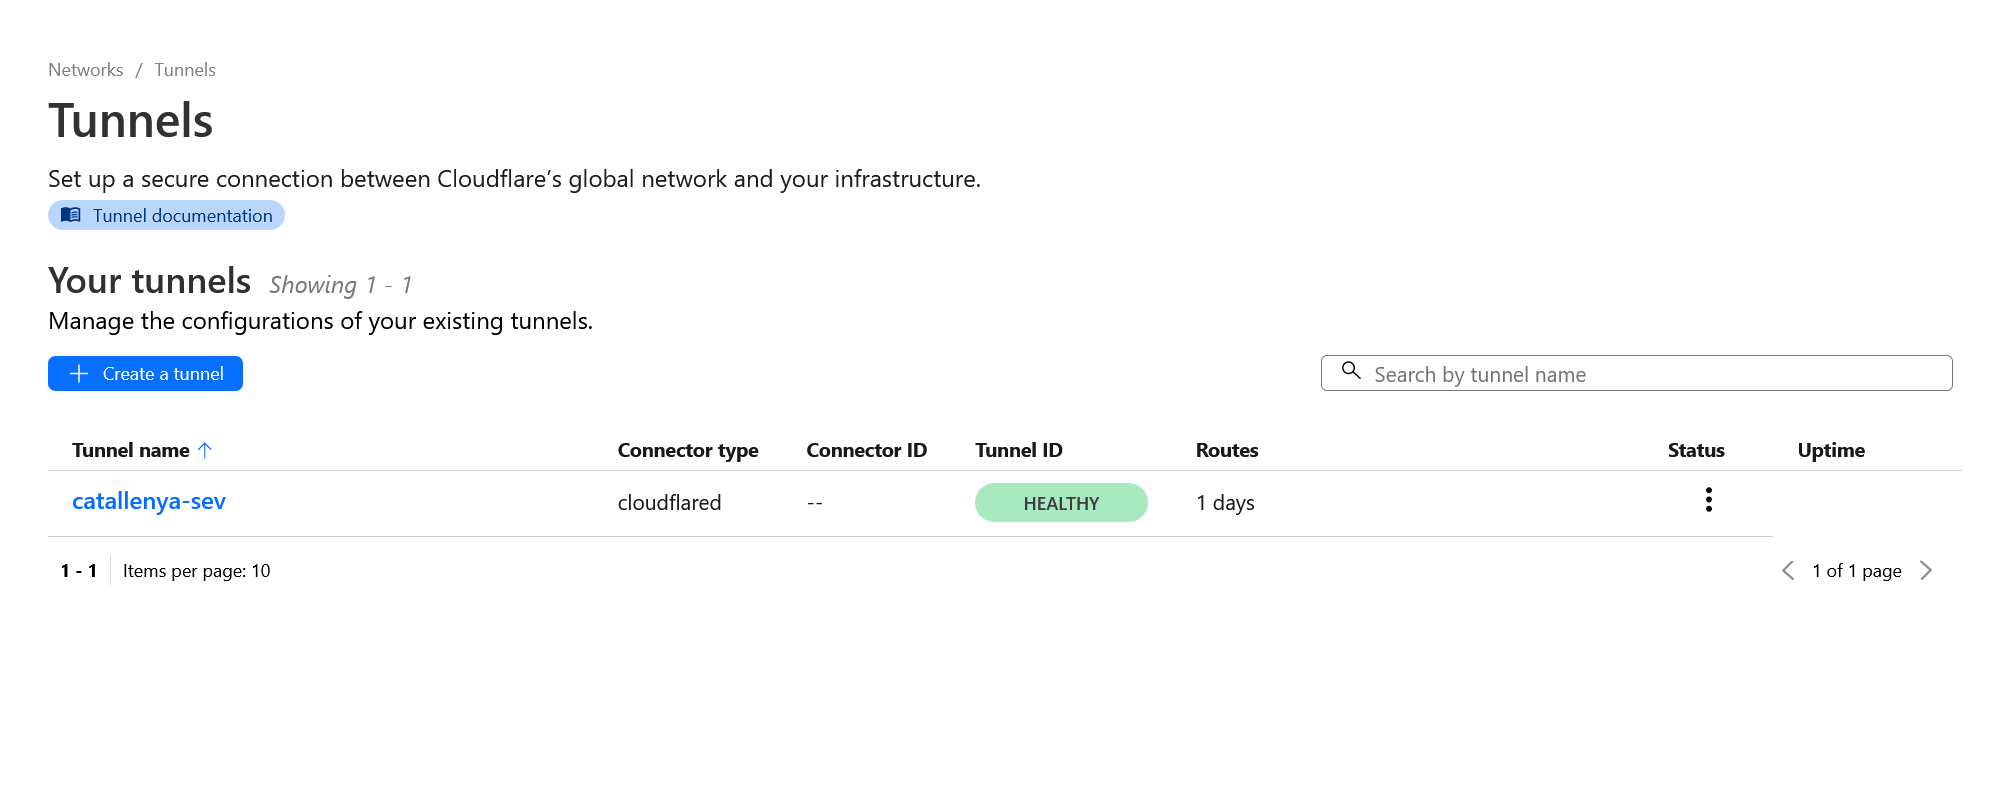
Generate a token by first logging in, and then specifying the tunnel name we created above.
cloudflared tunnel login
cloudflared tunnel token --cred-file ./cloudflared/token.json catallenya-sev
If this is configured properly, Cloudflare should detect the container and show it as healthy.
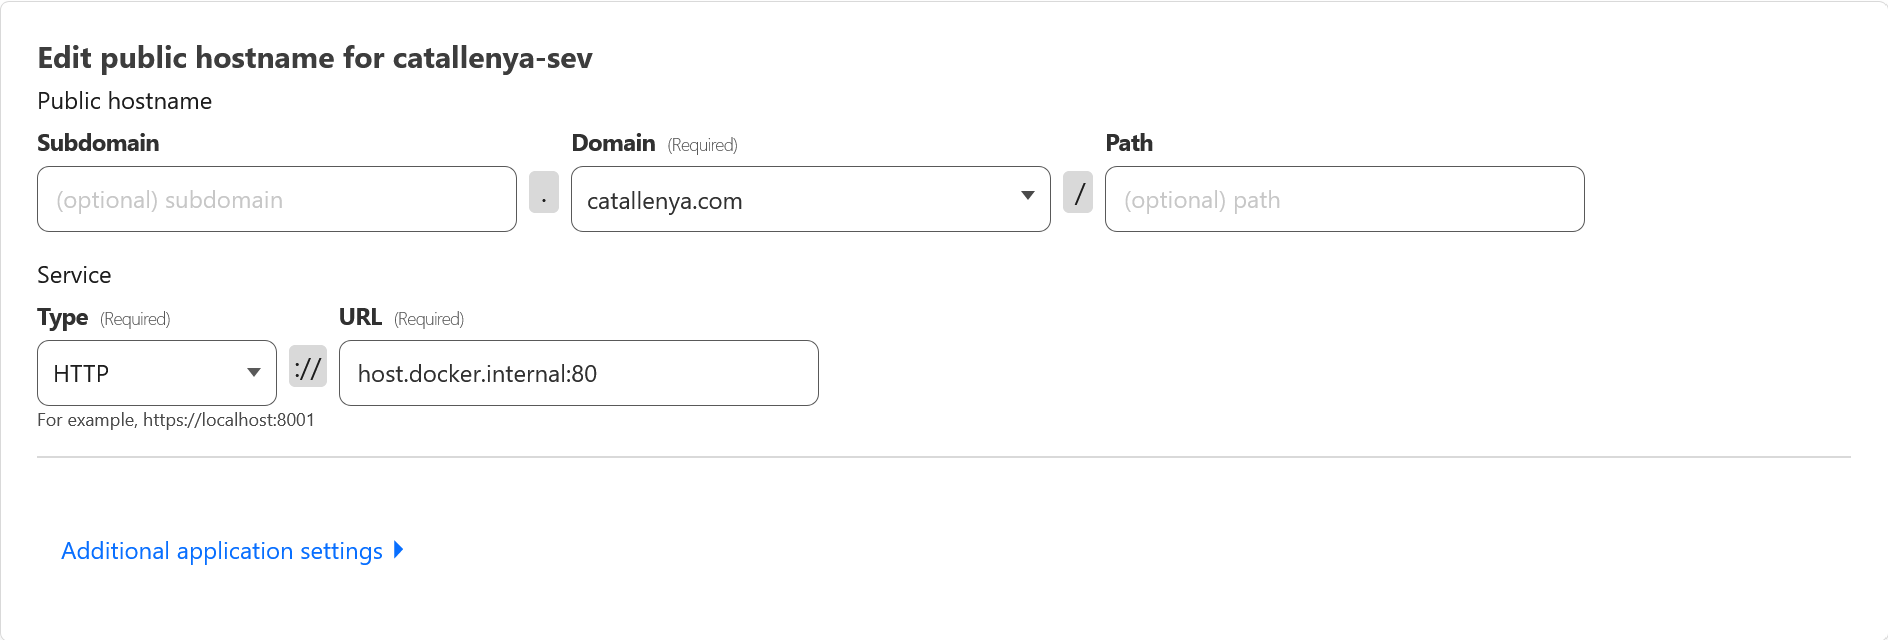
Finally we can point our domain, catallenya.com, to our our docker network. Caddy will intercept the request and redirect it to our ghost service. Since SSL termination is handled by Caddy, we can also add subdomains to different port numbers and update the Caddyfile to handle those requests. In the below example, share.catallenya.com will point to a port 3000 that Caddy will proxy internally to the share service running on port 80.
Finally we tell Cloudflare to tunnel request towards our domain, catallenya.com, to port 80 resolving against our internal docker IP.
Optionally, you can add a subdomain for other services i.e. share.catallenya.com and targeting the associated port. Remember to update the Caddyfile to account for this new route.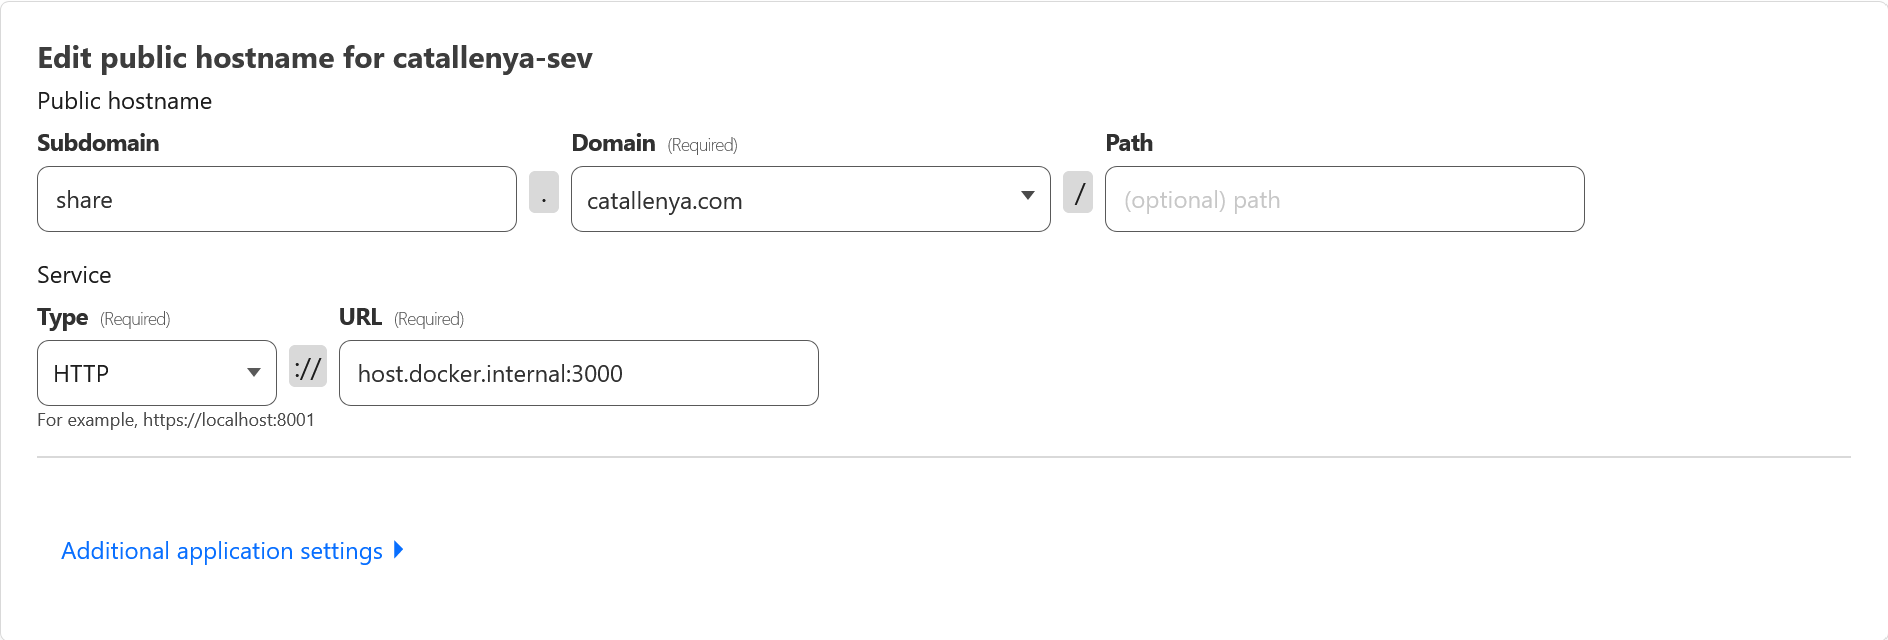
...

:3000 {
  reverse_proxy share:80
}

...
Only Cloudflare?
The original networking setup does not rely on a tailnet at all. Indeed, the astute amongst you might wonder since we use Cloudflare to proxy public traffic to our ghost blog, do they have a similar offering to lock it down for only authorized devices? With Cloudflare WARP, we can set up a Zero Trust organization, and add policies to only permit authorized WARP devices.
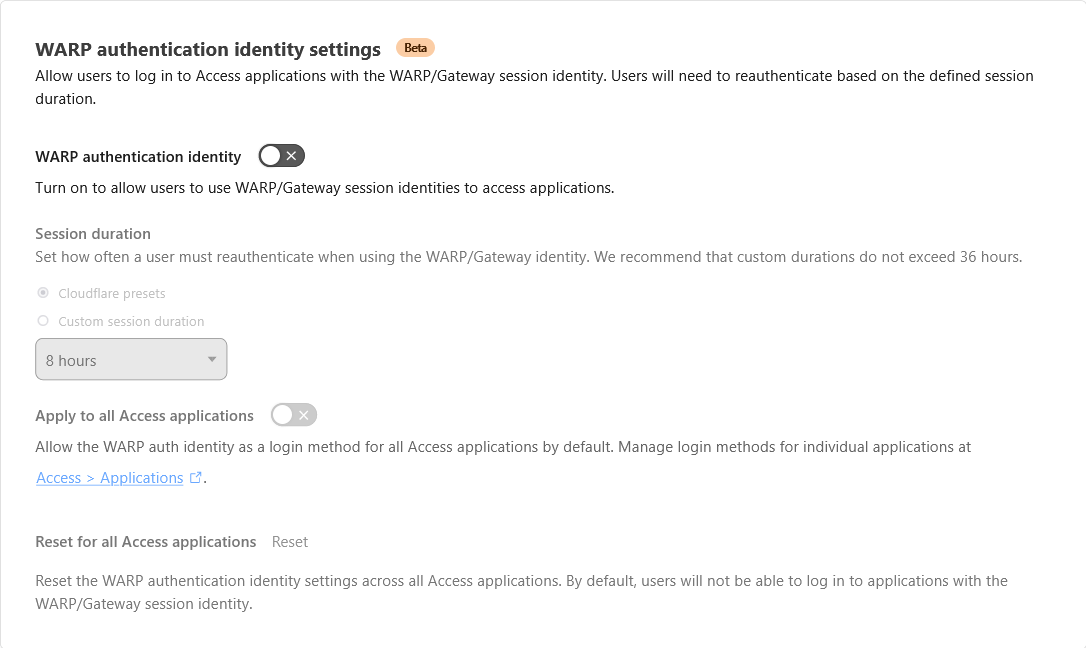


The biggest upside of using the WARP client method is that you no longer have to wrangle with ports. Instead, you can map your services to a human readable subdomain like jellyfin.catallenya.com or nextcloud.catallenya.com which are nice quality of life improvement.
However, there is one fundamental flaw with the WARP model which leads me to eschew it over using a tailnet. The WARP client is not a VPN. As such, it does not offer true E2E encryption. Indeed, clients are authorized off policies and does not offer the same safeguards as creating a encrypted Wireguard tunnel. Cloudflare does offer hop-to-hop encryption, where data transmitted to and from it's servers is encrypted. But Cloudflare does retain the keys to decrypt your data to scan packets to perform their product feature such as DDOS mitigation.
Depending on your security model, this might be a fair tradeoff. Considering my motive for self-hosting is to move away from third-party providers, I wasn't as comfortable with this. What is the point of self-hosting when your information is kept under lock and key, but a foreign third party is privy to your data in transit 🤷♂️?
Nonetheless, the Tailscale team has put together a fantastic comparison chart where you can pick the solution that best first your use case!